The Best Green Chile Stew

0

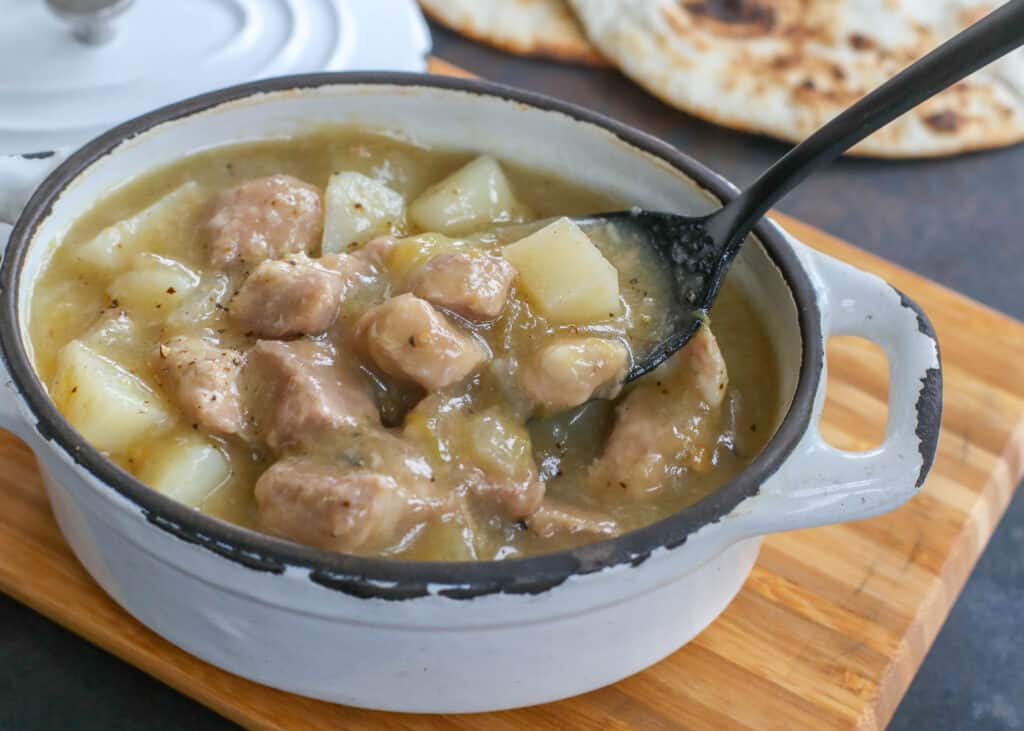
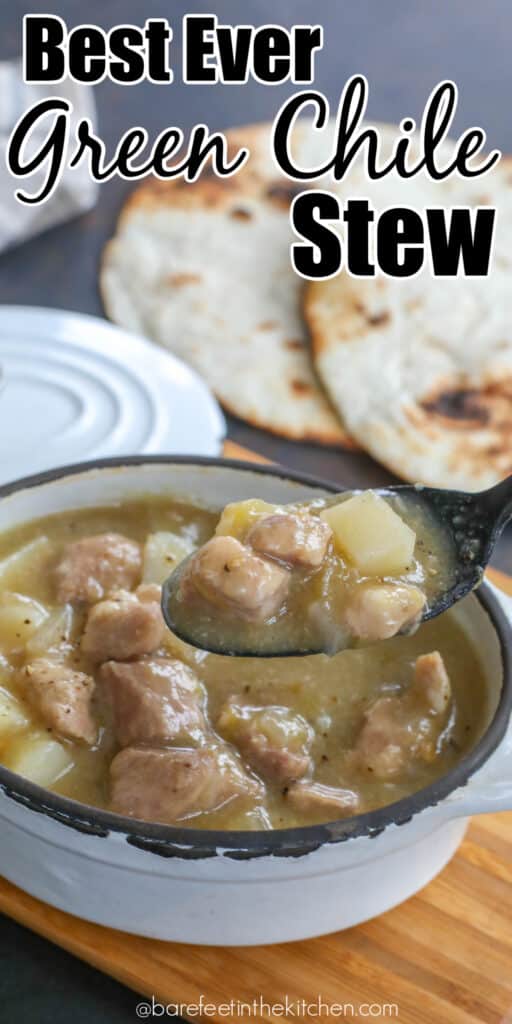
The best green chile stew is loaded with bite-sized chunks of pork that are seasoned with onion and plenty of garlic. The pork is simmered in a green chile sauce until tender enough to almost fall apart when you bite it.

Classic New Mexican Green Chile Stew

New Mexico Green Chile Stew

This is the ultimate comfort food.

Filled with that irresistible pork, potatoes, and roasted green chile, this stew is what I dream of when the weather starts cooling off each fall. And before any other native New Mexican can correct me, I am well aware of the ridiculousness of actually claiming the BEST NM Green Chile Stew, because technically, I do love them all.

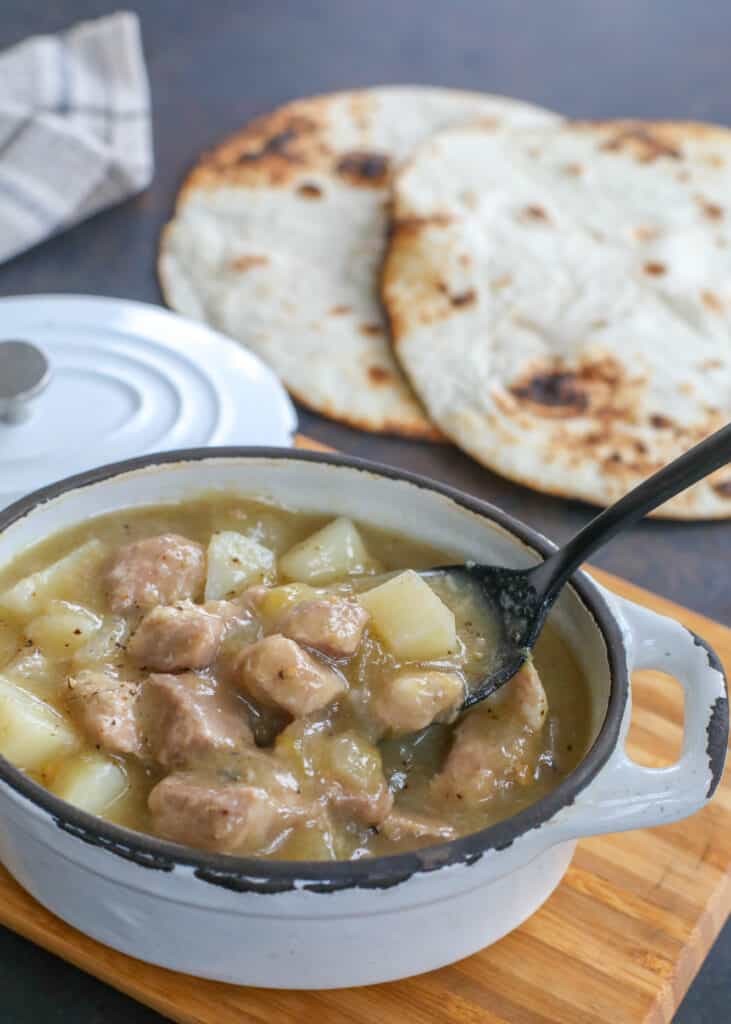
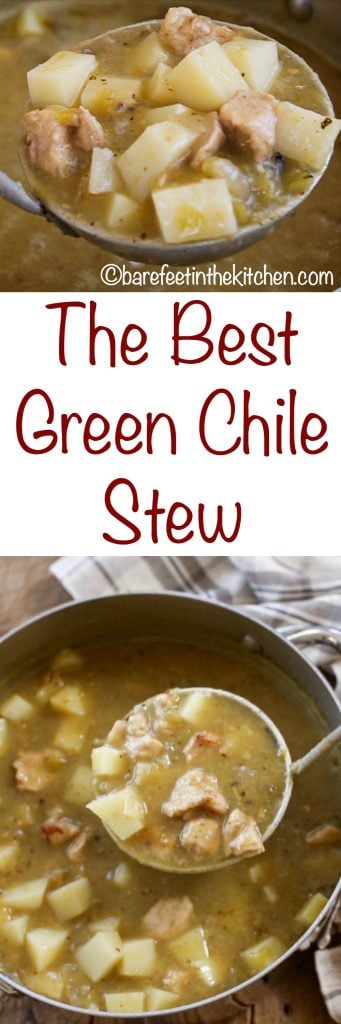
That said, this is my family’s best green chile stew, and we love it more than all the others. Made with chunks of tender pork and potatoes, spicy hot green chile, and a savory broth that you’ll be dipping your tortillas into and scraping the bowl clean, this is it for me.

Slow Cooker Green Chile Stew

Green Chile Stew

Over the years, I’ve made Green Chile Stew with many different kinds of meat: pork, ground beef, steak, and chicken. However, this Green Chile Stew is hands-down our favorite.

Not that I won’t happily try YOUR green chile stew recipe if you send it to me! I don’t discriminate between green chile recipes. We love adding green chile to our enchiladas, burritos, tacos, soups, and scrambled egg skillets. If the dish includes green chile, my boys will dive straight into it.

Green Chile Pork Stew

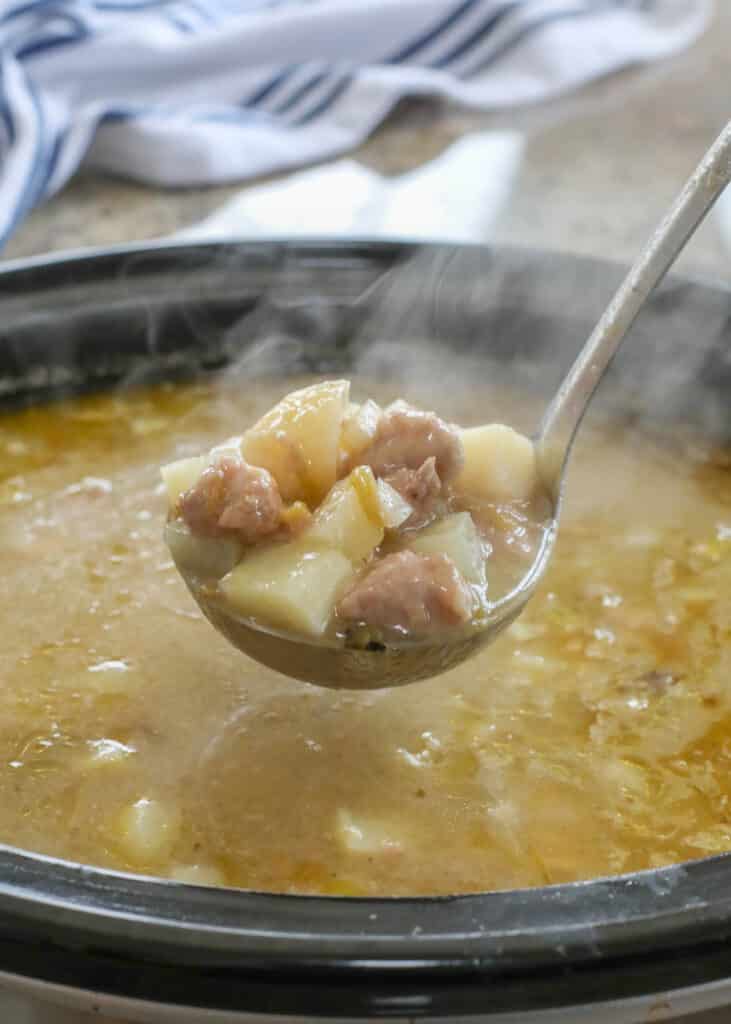
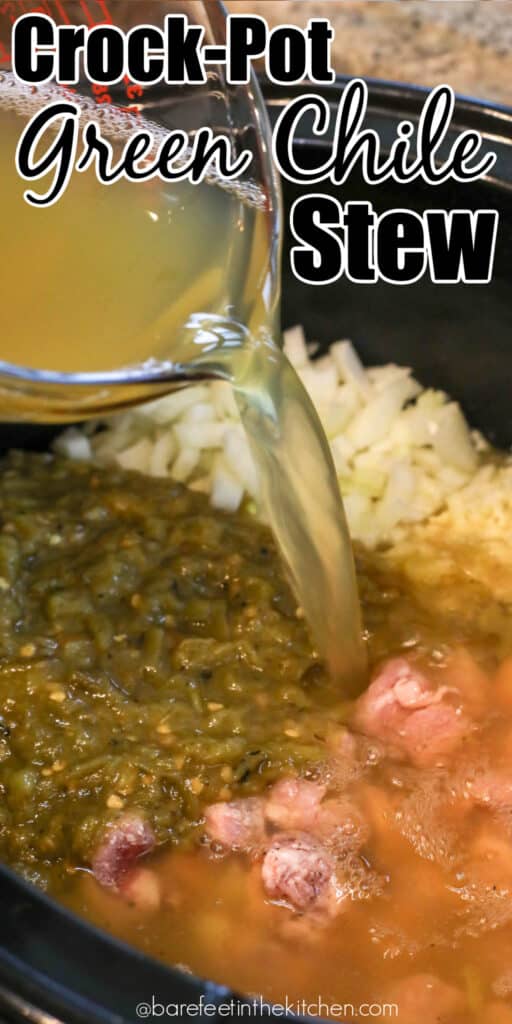
I’ve had so many requests for a slow-cooker version of this recipe, I finally played with it the other day. And I’m oh so happy to tell you that it worked beautifully.

You don’t even need to brown the meat! Just toss every ingredient into the crock-pot all at once and cover it with the lid. Simmer on HIGH for 6 hours. When the potatoes are fork-tender and the pork is tender enough to pull apart, it’s ready to eat!

This is my kind of recipe for sure, and it is easy as can be whether you make it on the stove or in the crock-pot! This native New Mexican happily eats her green chile with breakfast, lunch, and dinner.

Packed with so much flavor and hearty chunks of potatoes and pork, this is a simple winter meal that our entire family enjoys. There is more flavor from all of the chile in this recipe than there is actual heat.

My boys all began eating this green chile stew when they were barely on solid foods. We’re big fans of starting the green chile addiction early in life around here.

Stove-Top OR Crock-Pot Classic Green Chile Stew

Chili vs Chile

Is it chili or chile? In the end, it doesn’t really matter, as it’s all going to be delicious. Depending on where you live or happen to be at this moment, both words can be used to refer to a type of pepper, usually a hot one.

However, in New Mexico, chili typically is used when referring to a type of dish, like this steak chili or creamy chicken chili. And chile is used when referring to dishes that contain a good amount of chile peppers in the recipe.

Dishes made with green or red chile peppers are often named with chile in the recipe name. Foods like this Green Chile Stew are made with loads of green chile peppers, meat, and potatoes or beans. This is a stew, not a traditional chili recipe, so we call it a green chile stew, to recognize the chile in the recipe.

Pork Green Chile Recipe

If you’re new to cooking with chile or leery of the heat, I recommend starting with a mild green chile. In some grocery stores, you may be lucky enough to find frozen chile in the freezer section of the grocery store.

If frozen isn’t available, you should be able to find canned green chile in different levels of heat in most grocery stores. You can substitute salsa verde for the green chile sauce if you’re unable to find green enchilada sauce in your store.

Several years ago, I tried making this with sweet potatoes and my family went crazy over it. My favorite version is still the traditional stew made with white potatoes, but it is really great both ways. However you make it, this soup is fantastic.

ingredients for green chile stew in crockpot

Crock-Pot Green Chile Stew

Slow cookers or crockpots are an appliance of which I have more than one. If you are an avid slow cooker user like I am, you might understand the need for more than one. So, let’s talk about my favorites:

First up is this 6-quart slow cooker that has a locking lid. These crockpots are fantastic for transporting foods. Mine has gone everywhere from church potlucks to barbecues, game nights to Thanksgiving dinner. However, fair warning, these slow cookers run crazy hot. Low is closer to a boil than a simmer, the warm setting actually simmers. So trust me when I say HIGH is high.

My everyday slow cooker is this 8-quart Crockpot. It’s my go-to appliance for cooking large roasts and big batches of chili. Fun fact: did you know that a full 4-quart cooker, actually cooks more slowly than a half-full 8-quart cooker?

For just cooking a few pounds of chicken to shred for enchiladas or other smaller recipes, this 3-quart version is perfect.

Thanksgiving has become a breeze since I have mastered how to hold all of the side dishes using these medium-sized round slow cookers.

If you aren’t a fan of the idea of keeping more than one slow cooker in the house, these CrockPockets are a game-changer when it comes to preparing and holding multiple dishes at the same time. They slide into a standard 6-quart crockpot, dividing it into two sections that are perfect for serving different side dishes or keeping taco fillings warm for parties.

pouring broth into stew

Green Chile Stew Recipe

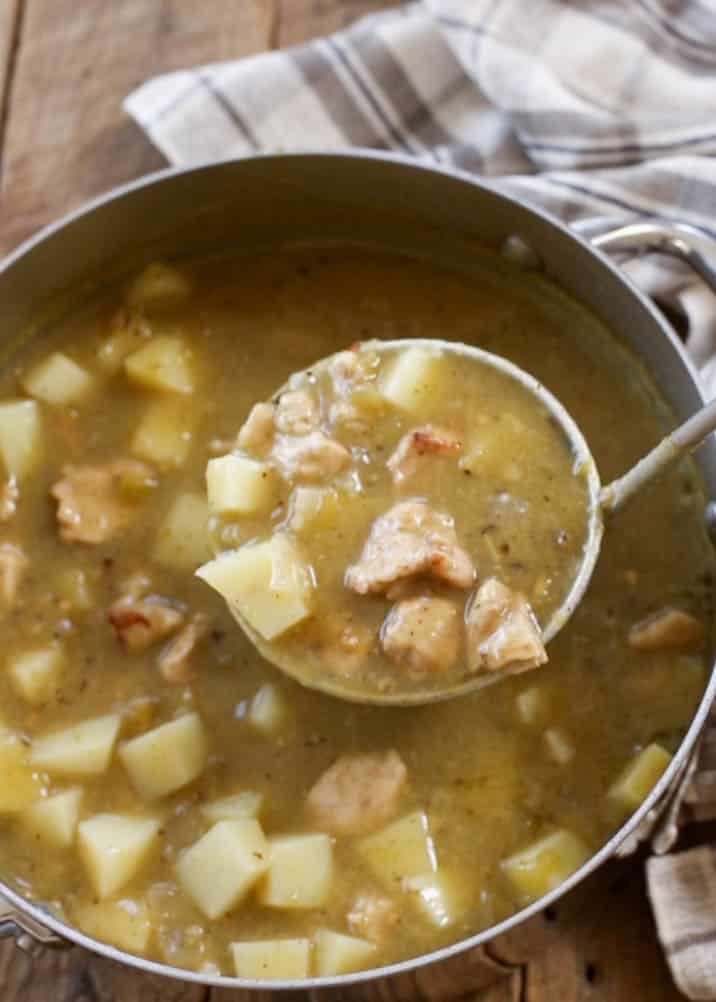
To make the stew on the stovetop: Combine the pork, flour, pepper, and garlic powder in a gallon-size Ziploc bag and shake well to coat. Saute the garlic and onion with a bit of oil in a large pot or Dutch oven and then add the flour-coated pork.

Cook the pork until browned, and then add the green chile, green chile sauce, stock, and salt. Cover and simmer on low for 45 minutes. Then, add the potatoes and simmer again, until the potatoes are fork-tender, approximately 15 minutes.

It gets even easier when you make the stew in a slow-cooker: Combine the pork, flour, pepper and garlic powder in a gallon-size Ziploc bag. Shake to coat thoroughly and then add the dusted pork to the crock-pot. Add the potatoes, chiles, green chile sauce, stock, and salt. Cover with lid and cook on HIGH for 6 hours, until the potatoes are fork-tender and the pork can be pulled apart.

close up of green chile stew on spoon

Green Chile Recipes

Do you like green chile? Do you like chicken pot pie? Do flaky buttery cheesy biscuits make you grin? If so, this spicy chicken pot pie casserole is going to make you very happy.

Crispy-edged green chile chicken burritos full of cheesy goodness are an easy-to-assemble mealtime hit, full of green chile flavor. Green chile waffles with cheddar and bacon are the latest cheesy waffle deliciousness to hit our table. If you’ve been hanging out with me here for long, you likely know just how big my weakness is for savory waffles.

Green chile carnitas are the perfect combination of two of my favorite savory things. It’s tough to find a combo that beats pork and green chile in my mind. Carnitas are cooked until melt in your mouth tender; then roasted at high temperature until the edges caramelize.

Green Chile Stew with Pork and Potatoes is everyone's favorite! Get the recipe at barefeetinthekitchen.com

New Mexico Recipes

For some more New Mexico favorites that you might like to try these Green Chile Chicken EnchiladasCalabacitas, and New Mexico Posole. These recipes are classic. And if you haven’t tried it yet, Carne en su Jugo (a.k.a. Meat in its Juices) is another dinner that my family really enjoys.

Cheesy green chile and bacon biscuits are a terrific addition to any meal and this easy drop biscuit recipe comes together in just minutes! Flaky pie crust filled with fluffy, creamy eggs, spicy green chile, and cheese adds up to a delicious green chile quiche for any day of the week.

Green chile guacamole is spicy with green chile, tangy with lime, and kept fresh with cilantro and spices. This guacamole is a favorite snack on game day or any day of the week.

Classic New Mexican Green Chile Stew

Print

The Best Green Chile Stew

Filled with tender pork, potatoes, and plenty of green chile, this is classic New Mexican Green Chile Stew at its best. Made on the stove or in the crock-pot, this recipe doubles beautifully!
Course Soup
Cuisine Mexican
Prep Time 15 minutes minutes
Cook Time 1 hour hour
Total Time 1 hour hour 15 minutes minutes
Servings 4 servings
Calories 480kcal

Ingredients

  • 1-2 pounds pork stew meat or pork shoulder chopped into ½” pieces
  • ¼ cup all-purpose flour or cornstarch
  • ½ teaspoon kosher salt
  • ½ teaspoon freshly ground black pepper
  • ½ teaspoon garlic powder
  • 1 tablespoon olive oil
  • ½ yellow onion chopped into 1/2 “ pieces
  • 3 large cloves garlic minced
  • 7 ounces chopped green chile about 3/4 cup worth (frozen works fine)
  • 28 ounces green chile enchilada sauce about 3½ cups worth
  • 3 cups chicken stock or water, plus 1 tablespoon chicken base
  • ½ teaspoon kosher salt adjust to taste
  • 4 cups diced potatoes about 2 large potatoes

Instructions

  • Combine the pork, flour, pepper and garlic powder in a gallon size Ziploc bag. Shake to coat thoroughly and then set aside.
  • In a large pot over medium heat, warm the oil. Add the fresh garlic and onion and sauté until translucent, approximately 2-3 minutes.
  • Add the dusted pork and cook until browned, approximately 5 minutes. Add the chiles, enchilada sauce, stock and salt and bring to a boil. Cover and simmer on low for 45 minutes.
  • Add the potatoes and raise heat to boil. Reduce to a simmer and cook until the potatoes are tender, approximately 15 minutes. Enjoy!

Video

Notes

SLOW COOKER DIRECTIONS: Combine all ingredients in the crock-pot and cover with lid. Cook on HIGH for 6 hours, or until potatoes and pork are tender. (This recipe doubles beautifully!)

Nutrition

Calories: 480kcal | Carbohydrates: 55g | Protein: 34g | Fat: 11g | Saturated Fat: 1g | Cholesterol: 79mg | Sodium: 2436mg | Potassium: 1939mg | Fiber: 6g | Sugar: 16g | Vitamin A: 1235IU | Vitamin C: 36.9mg | Calcium: 81mg | Iron: 8.7mg

{originally posted 1/4/2012 – recipe notes and photos updated 9/29/25}

The Best Ever Green Chile Stew is a classic recipe that we all love!
You're going to love this Green Chile Stew that you can make in the slow cooker!
Green Chile Stew made with pork and potatoes is a classic New Mexico favorite! Get the recipe at barefeetinthekitchen.com

The post The Best Green Chile Stew appeared first on Barefeet in the Kitchen.

BROCCOLI CHEESE SOUP

0

If you love simple recipes that really hit the spot, this broccoli cheese soup is easy and delicious! ❤️WHY WE LOVE THIS RECIPE We love easy recipes and this soup is simple. Comes together really quickly and has a great flavor. This soup is really versatile and one your family will love. It’s made with…

Fast & Flavorful Shrimp Scampi Skillet

0

This shrimp scampi recipe is simple and full of flavor. Ready in under 20 minutes, it’s perfect to pair with pasta, garlic bread, and a fresh salad for a dinner everyone will enjoy.

Cheesy Cream Cheese Chicken and Rice Casserole

0

Cheesy Cream Cheese Chicken and Rice Casserole

a photo of creamy chicken and rice casserole topped with melted cheese

If you’re craving a creamy and indulgent chicken casserole, then this cheesy chicken and rice casserole is a must-try! Made with juicy chicken, fluffy rice and lots of cheese, it’s a family favorite!

Growing up my mom made, and still does make, the best casseroles. I don’t care that it’s 2025 and people are worried more about kale pureed into overnight oats, casseroles feel like home and I’m always a fan of an easy chicken and rice recipe for dinner. We call this one angel chicken casserole in our house and it’s based off of two recipes, the crockpot chicken and rice recipe and Mom’s famous Busy Day Casserole recipe.

Typical angel chicken is a creamy sauce with chicken served over angel hair pasta, but I decided to transform the flavorful saucy chicken into a casserole by combining it with rice. It is total comfort food and full of delicious homey flavors! It’s called “angel chicken” for a reason…it tastes like heaven!

Ingredients for Cheesy Chicken and Rice Casserole

If you have some leftover chicken or bought a rotisserie chicken at Costco but aren’t sure how to use it, this recipe is a great option. You only need a few pantry staples to make this hearty and irresistible casserole recipe:

  • Cream Cheese: I recommend using full fat or possibly 1/3 less fat but avoid fat free for the best texture and flavor.
  • Butter: adds richness and flavor
  • Cooked Chicken: diced or shredded (I use rotisserie from Costco)
  • Cooked Rice: I use 1/3 wild rice and the rest white rice.
  • Cream of Chicken Soup: I use my homemade recipe, but feel free to use a can of condensed soup if you want.
    • NOTE: You can swap for cream of mushroom soup or cream of celery soup if needed.
  • Garlic: adds flavor
  • Good Seasons Dry Italian Dressing Mix: You can find this at the grocery store on the salad dressing aisle next to the other salad dressing packets.
  • Chicken Broth: helps keep the casserole moist as it bakes
  • Colby Jack Cheese: Some goes in the casserole and the rest gets sprinkled on top for extra cheesiness.
  • Salt and Pepper: adds flavor
  • Fresh Parsley: Don’t skip this! This is a creamy, cheesy and rich dish and the parsley adds the tiniest bit of brightness I think the casserole needs.

The measurements needed for each ingredient can be found in the recipe card at the end of the post.

How to Make Chicken and Rice Casserole

Casseroles sometimes get a bad wrap, but this chicken rice casserole recipe will make a casserole lover out of anyone! I guarantee it! It’s so easy to make too. Here are the basic steps:

  1. Prep: Preheat the oven to 350 degrees F and spray a 9×13” casserole dish with cooking spray.
  2. Whisk: Add the cream cheese and butter in a small bowl and whisk together to combine.
  3. Combine: In a large mixing bowl, add all the ingredients (saving half the cheese the fresh parsley for later) and stir until combined.
  4. Bake: Transfer the chicken and rice mixture into the prepared casserole pan and top with the remaining shredded cheese. Spray a piece of aluminum foil with nonstick spray and cover the dish. Bake for 25 minutes, removing the foil halfway through baking.
  5. Serve: Remove the oven and let the casserole sit for a few minutes. Sprinkle with the fresh parsley and serve!

All the instructions can also be found in the recipe card at the end of the post where you can print or save the recipe.

Variations

Casseroles are so easy to customize and this chicken casserole recipe is a great one to augment with vegetables or other add-ins. You could add peas, carrots, green beans, broccoli florets or mushrooms and it would be delicious!

You can also swap out the cheese for different cheeses. Swiss cheese, monterey jack or pepper jack would all be super tasty.

Tips for Making Angel Chicken Rice Casserole

Before you get started, make sure the chicken and rice are both cooked already. If you put the chicken in raw or the rice uncooked, neither will cook completely.

The butter and cream cheese both need to be at room temperature before adding them to the recipe so that they are smooth and creamy.

The Italian seasoning packet should be added to the recipe dry, just the powder. Do not make the Italian dressing before adding.

This is a great option for using up leftover chicken whether it’s grilled chicken or slow cooker whole chicken, any cooked chicken will work great! Chicken breasts and chicken thighs can both be used.

You can also use any rice you want. Brown rice, wild rice, white rice, etc. all will taste delicious! Just make sure it isn’t instant rice.

What to Serve with Chicken Casserole

I always like to balance out a rich and heavy casserole with a couple of light side dishes. A salad or vegetable side dish are both great options. Here are a few of our favorites:

Storing, Freezing and Reheating

Leftovers should be stored in the refrigerator in an airtight container. They will keep for 4-5 days. This casserole is also a great freezer meal option. Let it cool completely and then place in a freezer-safe container. It will keep in the freezer for up to 3 months. You can also freeze it before baking, which I actually recommend, just don’t add the cheese on top until right before baking.

To reheat it, let it thaw in the fridge overnight and then reheat it in a baking dish covered with foil in the oven preheated to 300 degrees F for 10-15 minutes or until heated through. If you’re just reheating a single serving, I just zap it in the microwave. It makes delicious leftovers!

This creamy and delicious casserole is the perfect comfort food for any night of the week. Packed with tender chicken, fluffy rice, and gooey cheese, this angel chicken and rice casserole is sure to be a hit with the whole family.

Video for How to Make Cream Cheese Chicken and Rice Casserole

More Comforting Casseroles to Try:

Print

Chicken and Rice Casserole

If you’re craving a creamy and indulgent chicken casserole, then this cheesy angel chicken and rice casserole is a must-try! Made with juicy chicken, fluffy rice and lots of cheese, it’s a family favorite!
Course Mom’s Best 100 Easy Chicken Recipes
Keyword casserole, chicken, comfort food, rice
Prep Time 15 minutes minutes
Cook Time 25 minutes minutes
Cooling Time 5 minutes minutes
Total Time 45 minutes minutes
Servings 12
Calories 375kcal
Author Carrian Cheney

Ingredients

  • 8 ounces Cream Cheese softened and cubed
  • 1/2 Cup Butter softened and cubed
  • 3 Cups Cooked Chicken diced or shredded (I use rotisserie from Costco)
  • 3 Cups Cooked Rice I use 1/3 wild rice and the rest white rice.
  • 1 ¼ Cup Cream of Chicken Soup
  • 3 Cloves Garlic minced
  • 0.7 ounce Good Seasons Dry Italian Dressing Mix
  • 1 Cup Chicken Broth
  • 2 ½ Cups Colby Jack Cheese shredded, divided
  • Salt and Pepper to taste
  • Fresh Parsley for garnish (don’t skip the parsley! This is a creamy and cheesy dish and the parsley adds the tiniest bit of brightness I think the casserole needs)

Instructions

  • Preheat the oven to 350 degrees F and generously spray a 9×13” casserole dish with cooking spray.
  • Whisk the cream cheese and butter together until smooth.
    8 ounces Cream Cheese, 1/2 Cup Butter
  • In a large mixing bowl, combine the cooked chicken, rice, butter and cream cheese mixture, cream of chicken soup, garlic, Italian dressing mix, chicken stock, half of the shredded cheese, and salt and pepper. Mix well until evenly combined.
    3 Cups Cooked Chicken, 3 Cups Cooked Rice, 1 ¼ Cup Cream of Chicken Soup, 3 Cloves Garlic, 0.7 ounce Good Seasons Dry Italian Dressing Mix, 1 Cup Chicken Broth, 2 ½ Cups Colby Jack Cheese, Salt and Pepper
  • Transfer the chicken and rice mixture into the prepared casserole dish.
  • Top with the remaining shredded cheese. Spray foil with nonstick spray and gently cover the dish.
  • Bake in the preheated oven for about 25 minutes, removing the foil halfway through baking.
  • Remove from oven, and allow the casserole to cool for 5 minutes. Garnish with fresh parsley, and enjoy.
    Fresh Parsley

Video

Nutrition

Serving: 1cup | Calories: 375kcal | Carbohydrates: 17g | Protein: 18g | Fat: 26g | Saturated Fat: 15g | Polyunsaturated Fat: 2g | Monounsaturated Fat: 7g | Trans Fat: 0.3g | Cholesterol: 93mg | Sodium: 646mg | Potassium: 321mg | Fiber: 0.4g | Sugar: 2g | Vitamin A: 884IU | Vitamin C: 0.2mg | Calcium: 219mg | Iron: 1mg

READ: Cheesy Cream Cheese Chicken and Rice Casserole

Apple Pumpkin Baked Oatmeal: A Cozy Fall Breakfast Recipe

If you’re searching for the perfect fall-inspired breakfast that’s healthy, filling, and irresistibly delicious, look no further than Apple Pumpkin Baked Oatmeal. This cozy baked oatmeal combines the sweetness of fresh apples with the creamy richness of pumpkin puree, creating a warm, comforting dish that’s ideal for chilly mornings. Packed with fiber, natural sweetness, and wholesome oats, it’s a recipe you’ll want to make again and again.

Whether you’re hosting a fall brunch, meal-prepping breakfast for the week, or simply craving something seasonal, this dish has it all—nutrition, flavor, and convenience. Let’s dive into everything you need to know about making the best Apple Pumpkin Baked Oatmeal at home.


Why You’ll Love Apple Pumpkin Baked Oatmeal

  • Seasonal Flavors – It’s like autumn in a baking dish. The pumpkin and apple pair perfectly with cozy spices like cinnamon, nutmeg, and cloves.
  • Meal Prep Friendly – Make it ahead and store in the fridge for a grab-and-go breakfast.
  • Healthy & Wholesome – Made with oats, pumpkin puree, apples, and natural sweeteners, it’s high in fiber, vitamins, and minerals.
  • Customizable – Add nuts, chocolate chips, dried cranberries, or seeds to make it your own.
  • Family-Friendly – Kids love the natural sweetness, and parents love the nutrition.

Key Ingredients

Here’s a breakdown of the ingredients that make this pumpkin apple baked oatmeal so irresistible:

  • Rolled oats – Use old-fashioned oats for the best texture.
  • Pumpkin puree – Adds moisture, natural sweetness, and nutrients like vitamin A and potassium.
  • Apples – Fresh apples provide juicy sweetness. Honeycrisp, Fuji, or Gala work beautifully.
  • Milk – Any milk works (dairy or plant-based like almond, oat, or soy).
  • Eggs – Help bind the oatmeal and give it structure.
  • Maple syrup or honey – Natural sweeteners that enhance the fall flavors.
  • Spices – Cinnamon, nutmeg, ginger, and cloves bring that pumpkin spice warmth.
  • Vanilla extract – Rounds out the flavors.
  • Optional toppings – Chopped pecans, walnuts, pumpkin seeds, or a drizzle of almond butter.

How to Make Apple Pumpkin Baked Oatmeal

This recipe comes together in under 15 minutes of prep. Here’s how to do it:

Step 1: Preheat and Prepare

  • Preheat your oven to 350°F (175°C).
  • Grease a baking dish (9×9-inch or similar).

Step 2: Mix Wet Ingredients

  • In a large bowl, whisk together pumpkin puree, eggs, milk, maple syrup, and vanilla extract.

Step 3: Add Spices and Dry Ingredients

  • Stir in cinnamon, nutmeg, ginger, and salt.
  • Add oats and mix well until combined.

Step 4: Add Apples and Nuts

  • Fold in chopped apples and any optional add-ins like walnuts or raisins.

Step 5: Bake

  • Pour mixture into prepared baking dish.
  • Bake for 40–45 minutes, until the top is golden brown and a toothpick comes out clean.

Step 6: Cool & Serve

  • Let it cool for 10 minutes before slicing.
  • Serve warm, topped with yogurt, nut butter, or an extra drizzle of maple syrup.

Apple Pumpkin Baked Oatmeal Recipe (Printable)

Ingredients:

  • 2 cups rolled oats
  • 1 cup pumpkin puree
  • 1 large apple (peeled & chopped)
  • 2 large eggs
  • 1 ¾ cups milk (dairy or non-dairy)
  • ¼ cup maple syrup or honey
  • 1 tsp vanilla extract
  • 2 tsp ground cinnamon
  • ½ tsp nutmeg
  • ½ tsp ground ginger
  • ¼ tsp ground cloves
  • 1 tsp baking powder
  • ¼ tsp salt
  • Optional: ½ cup chopped pecans or walnuts, ¼ cup dried cranberries

Instructions:

  1. Preheat oven to 350°F (175°C) and grease a 9×9-inch baking dish.
  2. In a bowl, whisk together pumpkin puree, eggs, milk, maple syrup, and vanilla.
  3. Add oats, baking powder, salt, and spices. Stir until well combined.
  4. Fold in apples and optional nuts/cranberries.
  5. Pour mixture into baking dish and spread evenly.
  6. Bake 40–45 minutes until golden brown and set.
  7. Cool slightly before serving.

Nutrition Benefits

This baked oatmeal with pumpkin and apples isn’t just delicious—it’s nutritious:

  • Oats – Rich in fiber, help keep you full and support digestion.
  • Pumpkin – Packed with vitamin A, antioxidants, and beta-carotene for healthy vision and immunity.
  • Apples – Provide vitamin C, potassium, and natural sweetness.
  • Nuts & seeds (optional) – Add protein and healthy fats.

A serving of this oatmeal (without extra toppings) averages:

  • Calories: ~220
  • Protein: 7g
  • Fiber: 5g
  • Fat: 6g
  • Carbohydrates: 34g

Tips for the Best Apple Pumpkin Baked Oatmeal

  • Use the right oats – Stick with old-fashioned rolled oats, not instant.
  • Choose sweet apples – Sweeter varieties like Honeycrisp or Gala balance the pumpkin flavor.
  • Don’t overbake – Keep an eye on the oven to prevent dryness.
  • Meal prep hack – Bake, cut into squares, and refrigerate for up to 5 days. Reheat in the microwave.
  • Freeze for later – Wrap portions individually and freeze for 2 months.

Variations to Try

  • Apple Pumpkin Chocolate Chip Oatmeal – Stir in ½ cup dark chocolate chips.
  • Vegan Pumpkin Apple Oatmeal – Replace eggs with flax eggs (2 tbsp ground flax + 6 tbsp water).
  • Apple Pumpkin Protein Oatmeal – Add a scoop of vanilla protein powder to the mixture.
  • Crunchy topping – Sprinkle granola or pumpkin seeds on top before baking.
  • Apple Pumpkin Overnight Oats – Skip the baking and refrigerate the mixture overnight instead.

Perfect Pairings

Pair your pumpkin apple oatmeal bake with:

  • A hot cup of coffee or chai latte.
  • Greek yogurt for added protein.
  • A drizzle of almond butter for richness.
  • Fresh fruit on the side for extra vitamins.

Frequently Asked Questions (FAQ)

1. Can I make this baked oatmeal ahead of time?
Yes! It’s perfect for meal prep. Bake on Sunday and enjoy all week.

2. Can I use steel-cut oats?
Not in this recipe, as they take longer to cook. Stick to rolled oats for best texture.

3. Can I use canned pumpkin pie filling?
No. Use pure pumpkin puree. Pumpkin pie filling already has sugar and spices added.

4. Can I make it without eggs?
Yes, replace with flax eggs or chia eggs to make it vegan.

5. How do I store leftovers?
Store covered in the refrigerator for up to 5 days or freeze portions individually.


Conclusion

Apple Pumpkin Baked Oatmeal is the ultimate fall breakfast recipe—warm, hearty, and packed with seasonal flavors. With its combination of wholesome oats, creamy pumpkin, juicy apples, and cozy spices, it’s a dish that will satisfy the whole family while nourishing your body. Plus, it’s perfect for meal prep and easy to customize.

So next time you’re craving something warm and comforting on a crisp autumn morning, whip up this apple pumpkin baked oatmeal. It might just become your new favorite seasonal tradition.

PUMPKIN SPICE CAKE MIX DONUTS

0

These easy cake mix pumpkin donuts are the perfect Fall treat! They come together quickly, and the caramel icing takes them to the next level. ❤️WHY WE LOVE THIS RECIPE If there is anything we love as a family, it is a donut, and these are the perfect Fall treat. Made with a cake mix,…

The Little Things Newsletter #488 – Life, laughter, and lots of great food!

Welcome to the weekend, my friends! I’m spending the day slowly catching up on work and planning to get out for a walk this afternoon, too. I love lazy days like today. The odds are good that there will be a puzzle in my future as well.

ON THE BLOGS THIS WEEK: Half a box of pasta, a pound of sausage, and some green cabbage that was tucked in the fridge added up to a winning last-minute meal. This sausage pasta was such a hit with my family that it’s become a regular player in our dinner rotation over the past few years.

Brimming with juicy pineapple and colorful bell peppers, this pineapple chicken stir fry is a little bit tangy, a little bit sweet, pretty to look at, and absolutely full of flavor. (I’m making it tonight, subbing shrimp for the chicken – can’t wait!)

These steak kabobs are calling my name again. The steak rests in a simple Asian-inspired marinade for a few minutes before being skewered along with slices of colorful bell peppers and red onions.

Creamy mushroom pasta is cream sauce perfection with sauteed mushrooms, garlic, parmesan cheese, and spaghetti noodles. I like to serve this with smashed Brussels Sprouts or these extra crispy roasted green beans

Peanut butter oatmeal balls pack a punch of rich peanut butter with the earthy taste of oats and that hint of sweetness we all crave. With the addition of a handful of chocolate chips and some mini M&M’s, these are a sweet treat you’ll be making often.

These chewy, dense, peanut butter cookies are an unforgettable memory from my childhood. Made with just an egg, a scant cup of peanut butter, and a cup of sugar, 3 ingredient peanut butter cookies are an old-fashioned cookie that everyone loves.

If you or someone you know loves Butterfinger candy bars, this is about to become their all-time favorite ice cream. Butterfinger ice cream is swirled with flakes of Butterfinger candy bars and loaded with bite-sized chunks of candy bar too!

What I’m CRAVING: My friend Christi’s insanely delicious chocolate peanut butter cookies. When I tell you that these are the best chocolate cookies I have ever tasted, I’m not being dramatic or even remotely exaggerating. She first shared them with me about ten years ago, and they are firmly established now as the greatest chocolate peanut butter combination possible.

My FAVORITE THINGS this week are these silk hair scrunchies. I bought these in 2019 and have probably used them 3-7 days a week ever since. That original set finally stretched out enough that I bought a new set last month. They’re still in great condition, just a little more stretched out than I like. I highly recommend them if you struggle with hair breakage or just want to be more gentle on your hair. I can wear my hair back all day long with these, and there will barely be a crease in my hair when I pull them out.

What I’m LISTENING to: Great God Who Saves by Laura Story. The entire album is a peace-filled gift, and I am really enjoying it. 

“Above all, love each other deeply, because love covers over a multitude of sins.” 1 Peter 4:8 NIV

Wishing you a beautiful week filled with little things that make you smile!

Mary

The post The Little Things Newsletter #488 – Life, laughter, and lots of great food! appeared first on Barefeet in the Kitchen.

All the Comfort of Lasagna, None of the Fuss

If there’s one dish that embodies comfort food, it’s lasagna. Layers of pasta, rich tomato sauce, creamy béchamel or ricotta, savory meat (or veggies), and melted cheese all baked together into bubbly, golden perfection. But as much as we love traditional lasagna, let’s be honest—it can be a labor of love. Between boiling noodles, making sauces, layering everything just right, and baking for nearly an hour, lasagna often feels like a dish reserved for special occasions or leisurely weekends.

What if you could enjoy all the comfort of lasagna, without the fuss? The good news: you can! In this guide, we’ll explore creative, time-saving alternatives and recipes that deliver all the flavors you love in lasagna, but in far less time and with much less effort. Whether you’re cooking for your family, meal-prepping, or just craving that cozy lasagna taste on a busy weeknight, these ideas will change the way you think about this classic Italian dish.


Why We Love Lasagna

Before we dive into shortcuts, it’s worth celebrating why lasagna is such a beloved dish.

  • Layers of flavor: The combination of pasta, sauce, cheese, and filling makes it hearty and satisfying.

  • Versatility: You can make it with beef, chicken, sausage, seafood, or keep it vegetarian. Gluten-free and vegan options are also easy to adapt.

  • Feeds a crowd: Traditional lasagna is the ultimate family-style meal, perfect for potlucks, gatherings, and Sunday dinners.

  • Comfort factor: Few foods say “home” more than a bubbling casserole of lasagna.

The only downside? The time and energy it takes to make it. That’s where “no-fuss lasagna” recipes come in.


Lasagna Without the Fuss: Quick and Easy Alternatives

Here are some clever ways to enjoy easy lasagna recipes that cut down the prep time without cutting back on taste.

1. Skillet Lasagna

One of the most popular shortcuts, skillet lasagna gives you all the flavor of traditional lasagna—right on the stovetop. Instead of layering noodles, you simply break them into pieces and simmer them directly in the sauce. Add dollops of ricotta or spoonfuls of béchamel, top with shredded mozzarella, and let it all melt together. Dinner is ready in about 30 minutes.

Why it works: The broken pasta cooks in the sauce, soaking up flavor while cutting prep time in half.

SEO Tip: Many readers search for “easy skillet lasagna recipe” or “one-pan lasagna,” so highlighting these keywords helps boost Google search ranking.


2. Lasagna Soup

Yes, soup! Lasagna soup is hearty, warming, and has all the flavors you crave—tomato broth, ground beef or sausage, herbs, noodles, and lots of cheese. Top each bowl with a scoop of ricotta and sprinkle of mozzarella for that gooey lasagna finish.

Why it works: You don’t need to fuss with layers; just simmer, ladle, and serve. Perfect for cold weather or a cozy night in.


3. No-Boil Noodle Lasagna

If you love traditional baked lasagna but hate pre-boiling noodles, use no-boil lasagna sheets. These thin, oven-ready pasta sheets soften as they bake, saving you an extra pot and step. Layer with sauce, cheese, and filling, pop in the oven, and you’re done.

Why it works: Cuts prep time dramatically and keeps cleanup to a minimum.

Pro Tip: Cover with foil for most of the bake, then uncover at the end to let the cheese brown.


4. Ravioli Lasagna Bake

Instead of using lasagna sheets, try layering frozen or fresh cheese ravioli with marinara sauce, ground meat, and shredded cheese. Ravioli acts as both pasta and filling, making this shortcut dish unbelievably simple and delicious.

Why it works: No need to mix ricotta or spread layers—ravioli does the work for you.


5. Lasagna Roll-Ups

For a fun twist, boil lasagna noodles, spread filling across each one, roll them up, and arrange them in a baking dish with sauce and cheese. Roll-ups cook faster and are easier to portion than a giant casserole.

Why it works: Same flavors, but much easier to serve and reheat. Perfect for meal prep.


6. Instant Pot Lasagna

If you own an Instant Pot or pressure cooker, lasagna gets even faster. By layering noodles, sauce, and cheese inside a springform pan that fits into the pot, you can pressure-cook lasagna in about 30 minutes.

Why it works: Cuts baking time dramatically while still delivering that layered lasagna experience.


Easy Lasagna Recipes for Busy Weeknights

Here are three quick recipes to try that bring all the comfort of lasagna to your table—without the fuss.


Recipe 1: 30-Minute Skillet Lasagna

Ingredients:

  • 1 lb ground beef or Italian sausage

  • 1 onion, chopped

  • 3 garlic cloves, minced

  • 24 oz jar marinara sauce

  • 2 cups chicken or beef broth

  • 8 lasagna noodles, broken into pieces

  • 1 cup ricotta cheese

  • 1 ½ cups shredded mozzarella

  • ¼ cup grated Parmesan

  • 2 tsp Italian seasoning

  • Fresh basil for garnish

Instructions:

  1. In a large skillet, cook beef, onion, and garlic until browned.

  2. Stir in marinara, broth, noodles, and seasoning. Cover and simmer until noodles are tender (about 15–18 minutes).

  3. Stir in dollops of ricotta, sprinkle mozzarella and Parmesan over top, cover until cheese melts.

  4. Garnish with fresh basil and serve.


Recipe 2: Lazy Ravioli Lasagna Bake

Ingredients:

  • 1 (25 oz) bag frozen cheese ravioli

  • 24 oz marinara sauce

  • 2 cups shredded mozzarella

  • ½ cup Parmesan

  • 1 lb cooked ground beef or sausage (optional)

Instructions:

  1. Preheat oven to 375°F (190°C).

  2. In a greased baking dish, spread 1 cup sauce on the bottom.

  3. Add a layer of ravioli, then sauce, then meat (if using), and sprinkle with cheese.

  4. Repeat layers until dish is full.

  5. Bake uncovered for 35–40 minutes until bubbly and golden.


Recipe 3: Lasagna Soup

Ingredients:

  • 1 lb ground sausage or beef

  • 1 onion, chopped

  • 3 garlic cloves, minced

  • 4 cups chicken broth

  • 2 cups marinara sauce

  • 2 tsp Italian seasoning

  • 8 lasagna noodles, broken into small pieces

  • 1 cup ricotta cheese

  • 1 cup shredded mozzarella

  • Fresh parsley for garnish

Instructions:

  1. In a large pot, cook sausage, onion, and garlic until browned.

  2. Add broth, marinara, and seasoning; bring to a boil.

  3. Stir in noodles and cook until tender (about 10 minutes).

  4. Ladle into bowls, top with ricotta and mozzarella, garnish with parsley.


Tips for Making Fuss-Free Lasagna

  • Use pre-made sauces: Jarred marinara or Alfredo can save you 30+ minutes.

  • Pre-shredded cheese: While fresh-grated melts best, pre-shredded saves time.

  • Batch cook: Double recipes like skillet lasagna or ravioli bake and freeze portions.

  • Vegetable shortcuts: Frozen spinach, mushrooms, or zucchini can add nutrition without extra chopping.

  • Use a slow cooker: For hands-off cooking, assemble layers in the morning and let it cook all day.


Healthy and Dietary-Friendly Options

Lasagna doesn’t have to be heavy. These fuss-free versions make it lighter without losing flavor:

  • Zucchini or eggplant lasagna: Use thin veggie slices instead of noodles.

  • Gluten-free lasagna: Use gluten-free noodles or zucchini slices.

  • Vegan lasagna: Use dairy-free cheese and lentils or veggies instead of meat.

  • Low-carb lasagna soup: Skip the pasta and add extra vegetables.


Why Fuss-Free Lasagna is Perfect for Families

Busy families often struggle to balance healthy, comforting meals with tight schedules. Easy lasagna recipes check all the boxes:

  • They’re hearty enough for kids and adults.

  • They’re adaptable to picky eaters (swap fillings easily).

  • They can be made in under 30 minutes (skillet or soup versions).

  • They can be made ahead and reheated for busy nights.


FAQs About No-Fuss Lasagna

1. Can I freeze these recipes?
Yes! Ravioli lasagna and roll-ups freeze especially well. Wrap tightly in foil and bake from frozen when ready.

2. What’s the best cheese combo for lasagna?
Ricotta (or cottage cheese) + mozzarella + Parmesan is the classic trio, but you can also use provolone or fontina.

3. Can I make it vegetarian?
Absolutely—skip the meat and load up with spinach, mushrooms, zucchini, or lentils.


Conclusion

Lasagna doesn’t have to be complicated to be comforting. With recipes like skillet lasagna, ravioli bakes, and lasagna soup, you can bring all the rich, cheesy, saucy flavors of traditional lasagna to your table—without hours of prep or cleanup. Whether you’re cooking for a crowd, meal prepping, or just feeding yourself on a busy weeknight, these fuss-free lasagna recipes prove that comfort food doesn’t have to be complicated.

So the next time a lasagna craving strikes, skip the hassle and try one of these easy lasagna recipes. You’ll get all the comfort you crave—none of the fuss.

Easy Air Fryer Fried Apple Rings

0

Easy Air Fryer Fried Apple Rings

several air fried apple rings coated in golden batter and cinnamon sugar sitting on a plate

This Easy Air Fryer Fried Apple Rings is the most delicious fall dessert recipe! These Apple Rings are the most mouthwatering apple slices covered with a batter that puffs up and is coated with crunchy cinnamon sugar.

It’s like an apple pie, apple crisp and donut all in one and with a fraction of the effort!

FRIED APPLE RINGS

Fried Apple Rings or Apple Fritters were one of my favorite treats growing up in Washington. The only problem was getting them. They are a specialty treat even in the state of apples.

Ingredients for Fried Apples in the Air Fryer

  • Flour: Acts as the base for the simple batter.
  • Sugar: Adds sweetness and texture to the batter.
  • Baking Powder: Give the batter some rise and fluffiness.
  • Salt: Enhances the flavors.
  • Whole Milk: Binds all the batter together.
  • Egg: Give the batter structure.
  • Butter: Adds rich flavor to the batter. Helps the sugar spice mixture to stick to the rings.
  • Vanilla Extract: Adds flavor.
  • Cinnamon: Adds warm flavor that is a signature combination with apple.
  • Ground Cardamom: Adds an additional layer of warm flavor.
  • Granny Smith Apples: Honeycrisp apples could also be used. Avoid using soft apples like McIntosh or Golden Delicious.

How to Make This Fried Apples Recipe

  1. Prep: Peel, core and slice the apples. Line a baking sheet with parchment paper.
  2. Make Batter: Combine all the ingredients for the batter in a medium bowl starting with whisking the dry ingredients and then adding the wet ingredients.
  3. Make Cinnamon Coating: In a separate small bowl, whisk together the sugar, cardamom and sugar.
  4. Coat the Apples: Dip the apples in the batter and place them in a single layer on the parchment lined baking sheet.
  5. Freeze: Stick the baking sheet in the freezer and let the battered apples freeze for 45-60 minutes.
  6. Air Fry: Preheat the air fryer and then air fry the apples in batches for 7-9 minutes.
  7. Finishing Touches: Immediately brush the air-fried apples with melted butter and dredge in the cinnamon sugar. Serve immediately!

PRO TIP

Cut your apples using a chef’s knife or a mandolin for faster, even slicing. I like to use a little melon baller to remove the core.

Tips for Making Air Fryer Fried Apple Rings:

  • Use the right apple! A firm apple like Granny Smith, Gala or Honey Crisp is essential.
  • In a hurry? You can leave the peel on!
  • Use a mandolin slicer to cut the apples into even 1/4 inch slices so they cook evenly.
  • Do NOT make in advance! These are not a good make ahead treat, however they reheat fairly well just not as crispy.
  • Make it a la mode! Top a stack off with some vanilla or caramel ice cream and caramel sauce drizzle.

How to Reheat Fried Apple Rings

Heat the air fryer or oven to 400 degrees F and reheat until puffing and crisping again. They will be softer than the original, but still delicious.

Don’t Miss Out on THIS Recipe!

While I love the sweetness of apple desserts, my absolute favorite fall/winter recipe with apples is actually our roasted apple salad. If you’ve never had roasted apples, you are missing out!

Sweet and Savory Apple Recipes

I am a huge fan of fall desserts and especially love apple desserts! I’m sure you’ve noticed my love for dutch apple pie-one of our most popular recipes ever (especially for Thanksgiving so make sure you pin it now!), apple crisp with the best oatmeal topping ever, classic apple pie with essential tips for the filling, and a savory option that’s the perfect sweet and savory combo- apple chutney pork chops!

Quick and easy apple dessert idea! These cinnamon sugar-coated apple rings are made in the air fryer—light, crispy, and totally addictive. Perfect for fall, holidays, or anytime!

Watch How These Fried Apple Rings are Made…

More Apple Recipes You Need to Save

Print

Air Fryer Fried Apples

It’s like an apple pie, apple crisp and donut all in one and with a fraction of the effort!
Course 500+ Best Dessert Recipes, Over 100 Favorite Fruit Dessert Recipes
Keyword air fryer, apple, apple dessert, apple dessert recipes
Prep Time 15 minutes minutes
Cook Time 20 minutes minutes
Freezing Time 45 minutes minutes
Total Time 1 hour hour 20 minutes minutes
Servings 4
Calories 445kcal
Author Carrian Cheney

Ingredients

  • ¾ Cup Flour
  • ¾ Cup Sugar divided
  • ¼ teaspoon Baking Powder
  • ¼ teaspoon Salt
  • Cup Whole Milk
  • 1 Egg large
  • 4 Tablespoons Butter melted, divided
  • ½ teaspoon Vanilla Extract
  • 1 ½ teaspoons Cinnamon
  • teaspoon Ground Cardamom *optional
  • 3 Granny Smith Apples or honey crisp apples, peeled, cored and cut crosswise into ¼” slices

Instructions

  • Line a baking sheet with parchment paper.
  • In a medium bowl, combine flour, 2 tablespoons sugar, baking powder and salt. Whisk until smooth.
    ¾ Cup Flour, ¾ Cup Sugar, ¼ teaspoon Baking Powder, ¼ teaspoon Salt
  • Add the milk, egg, 1 tablespoon of melted butter and vanilla and combine. Set aside.
    ⅔ Cup Whole Milk, 1 Egg, 4 Tablespoons Butter, ½ teaspoon Vanilla Extract
  • In another bowl, whisk the rest of the sugar, cinnamon and cardamom. Set aside.
    ¾ Cup Sugar, 1 ½ teaspoons Cinnamon, ⅛ teaspoon Ground Cardamom
  • Using a fork or your fingers, dip the apples into the batter, allowing excess to drip off and place apple slices on the prepared baking sheet. Freeze for 45-60 minutes.
    3 Granny Smith Apples
  • Arrange on the air fryer pan, working in batches, and cook at 425℉ for 7-9 minutes.
  • Remove and immediately brush with melted butter and dredge in cinnamon sugar. SERVE IMMEDIATELY!
    4 Tablespoons Butter

Video

Notes

You can reheat the apples by placing them on a parchment lined baking sheet in a 425 degree F oven or air fryer for 7 or so minutes. They reheat quite well!

Nutrition

Serving: 6rings | Calories: 445kcal | Carbohydrates: 77g | Protein: 6g | Fat: 14g | Saturated Fat: 8g | Polyunsaturated Fat: 1g | Monounsaturated Fat: 4g | Trans Fat: 0.5g | Cholesterol: 76mg | Sodium: 269mg | Potassium: 281mg | Fiber: 4g | Sugar: 54g | Vitamin A: 551IU | Vitamin C: 6mg | Calcium: 90mg | Iron: 2mg

READ: Easy Air Fryer Fried Apple Rings

Crispy, Mess-Free Bacon That’s Perfect Every Time

0

Looking for an easy way to cook bacon so it’s perfectly crispy every time? Bacon made in the oven is the answer. No splatters, no grease on the stovetop, and no flipping required!